What Touch Up Paint Products do I need to Order?
Table of Contents
- Product Sizes & Applications
- Coverage Calculator
- Paint Specifications
- Thinning Requirements
- What to Order by Application
- Additional Products Explained
- Surface-Specific Instructions
- Common Repair Scenarios
- Painting Over Existing Paint
- Special Applications
- Painting Your Entire Vehicle
- Critical Reminders
Product Sizes & Applications
Paint Pen (0.5 oz)
- Best for: Very small chips and scratches
- Maximum area: Pencil eraser size
- Shelf life: 2+ years when stored properly (cool, dry place)
- Important: Do NOT use on areas larger than a pencil eraser
Brush Cap Bottle (1 oz)
- Best for: Small repairs using a brush
- Maximum area: Dime size
- Warning: Areas larger than a dime will look uneven, especially with metallic paints
- Shelf life: 2+ years when stored properly
Brush Cap Bottle (2 oz)
- Best for: Multiple chips or use with spray equipment
- Coverage: Approximately 3 square feet (two good coats)
- Important: Must be thinned 1:1 with automotive lacquer thinner if spraying
- Shelf life: 2+ years when stored properly
Spray Can (12.5 oz)
- Coverage: 4 square feet per can
- Ready to use: Pre-mixed, no thinning needed
- Shelf life: Several years
- Includes: Extra nozzles
- Best for: Any area larger than a dime
Larger Sizes
- Pint (16 oz): 15 sq ft coverage
- Quart (32 oz): 30 sq ft coverage
- Gallon (128 oz): 120 sq ft coverage
- Requires: Your own spray equipment
- Pre-mixed: Ready to spray, no thinning needed
- Shelf life: Several years unopened; quality degrades after opening
Paint Coverage
| Product | Square Feet Coverage |
|---|---|
| 2 oz. Brush Cap Bottle | 3 |
| 12.5 oz. Spray Can | 4 |
| 16 oz. - Pint | 15 |
| 32 oz. - Quart | 30 |
| 128 oz. - Gallon | 120 |
Spray Can Calculator
|
Enter the width and length of your repair in inches to determine how many spray cans to order. |
|
|
Width: |
Length: |
|
Square feet: |
# of Spray cans to order: |
Paint Specifications
Paint Brand
We use PPG paint for most of our paint. Our spray clearcoat is urethane.
Paint Types
- Basecoat/Clearcoat: Most modern vehicles
- Tricoat: If your paint has the word "Tricoat" in the paint name, it has a tricoat formula and our order form will automatically include both the basecoat and midcoat paint in your order.
- Single Stage: Older vehicles (no clearcoat required)
Thinning Requirements
When Thinning is Required
The pints, quarts and gallons come ready to spray so no thinning is necessary. Spray cans also come ready to use.
If you are spraying the paint from the 2oz. size in a spray gun, you must thin the basecoat and midcoat paint 1:1 with automotive lacquer thinner (not the lacquer thinner sold at Home Depot, etc.). The clearcoat is usually thinned with 1 to 2 parts thinner to one part clearcoat. Check the label for instructions.
You can use a regular automotive spray gun, an airbrush or the Preval sprayer available at most auto parts stores.
Important Notes About Thinning
- Lacquer Thinner Type: Must be AUTOMOTIVE lacquer thinner. There is a big difference between the lacquer thinner sold at Home Depot versus automotive lacquer thinner. Our paint is not soluble in regular lacquer thinner.
- California Note: In certain areas of California, automotive lacquer thinner is illegal and cannot be used. Check with your local authorities.
- Alternative Thinner: You can use the recommended basemaker as a thinner (reducer). The reduction is 1:1 and they have different basemakers for different temperatures in the range of 65-85�F. For example, DUP7175S would be suitable for temperatures up to 75�F. You will need to purchase this locally.
- Test First: The 1:1 thinning ratio is a guide and may need to be adjusted. Always test the spray pattern first! If the paint is coming out too thick or stringy, add more automotive lacquer thinner and try another spray pattern test.
How Long Will the Paint Last?
- Paint Pens: Can last a couple of years if stored in a cool, dry place. If you leave the cap off in the hot sun, the paint will evaporate quickly!
- Brush Cap Bottles: Will also last a couple of years if stored properly. Sun and heat will quickly ruin the paint.
- Spray Cans: Will last several years. The nozzle may clog if it has not been cleaned properly, but we ship extra nozzles with spray cans.
- Larger sizes: Will last several years if unopened. Once opened, the paint quality will degrade over the next few years.
What to Order by Application
Small Chip Repair (Paint Pen)
For chips no larger than a pencil eraser
Required:
- 0.5 oz primer paint pen (if bare surface exposed)
- 0.5 oz basecoat paint pen (+ midcoat for tricoat paints)
- 0.5 oz clearcoat paint pen
- 2 oz rubbing compound
- 2 oz acrylic lacquer thinner
Recommended:
- Wax and grease remover
Brush Application (Areas up to Dime Size)
Required:
- 1-2 oz brush cap bottle primer (if bare surface exposed)
- 1-2 oz brush cap bottle basecoat (+ midcoat for tricoat)
- 1-2 oz brush cap bottle clearcoat
- 2 oz rubbing compound
- 2 oz acrylic lacquer thinner
Recommended:
- Wax and grease remover
Spray Application (Larger Areas)
Required:
- 12 oz primer spray can (for bare surfaces)
- 12 oz basecoat spray can per 4 sq ft (+ midcoat for tricoat)
- 12 oz clearcoat spray can per 4 sq ft
- 2 oz rubbing compound
- Tack rag
- Sandpaper pack
- 2 oz acrylic lacquer thinner
Recommended:
- Wax and grease remover
- Spray can trigger (for better control)
- Chemical respirator
Non-Metal/Flexible Surface Repair (Spraying)
Required (in addition to spray application items):
- 11.3 oz SEM Adhesion Promoter
Optional:
- Flexible bumper repair kit (for tears)
- Auto body filler (for dents)
- Spot putty (for deep scratches)
Additional Products Explained
SEM Adhesion Promoter (11.3 oz)
A clear spray which makes paint stick to all automotive surfaces such as vinyl, plastic, fiberglass, galvanized metal, chrome, aluminum and glass.
- Coverage: 4 square feet
- Application: Apply before primer on non-metal surfaces
- Safety: Very toxic product - use goggles, respirator and rubber gloves. Keep away from children!
Rubbing Compound (2 oz)
This is used to smooth and shine the paint. If you do not polish the clearcoat with rubbing compound, the paint will not shine.
- Type: Medium-duty compound
- Application: Apply with clean cotton T-shirt (never terry cloth or paper towels)
- Note: May leave swirl marks with machine application (use polishing compound to remove)
- Compatibility: Works with all clearcoats and paints as long as the finish is dry
Common Rubbing Compound Questions
Q: Will your rubbing compound leave swirl marks?
A: Yes, if you are using a machine to apply the rubbing compound. These swirl marks can be taken out with a polishing compound which is much finer than rubbing compound.
Q: Will your rubbing compound dull the existing finish?
A: Only if applied incorrectly. If you use the wrong kind of material to apply the compound, you will dull the finish and leave scratch marks. You must use an old, clean cotton T-shirt. Do not use terry cloth, shop rags, paper towels. Make sure the T-Shirt is clean - just one small piece of grit will scratch your finish.
Q: What is the difference between your rubbing compound and the stuff they sell in the stores?
A: Our rubbing compound is a medium duty compound as opposed to the heavy duty compound they sell in the stores. Do not use heavy duty rubbing compound on new paint. It will dull the surface instead of making it shine.
Q: The area I compounded turned out dull and looks scratched. What do I do now?
A: You probably used the wrong kind of material to apply the rubbing compound. You will need to purchase some polishing compound to remove the scratches and bring back the shine.
Acrylic Lacquer Thinner (2 oz)
Very handy to have around! Great for the paint pen as you can clean the nib. You can also remove excess paint. It can also be applied to a soft cloth to bring down the level of the paint.
Important: You cannot use regular lacquer thinner. There is a big difference between the lacquer thinner they sell at Home Depot versus automotive lacquer thinner. Our paint is not soluble in regular lacquer thinner so you need automotive lacquer thinner to use with our paint.
Sandpaper Pack
Used for sanding the primer, paint and clearcoat if necessary. On small repairs, we recommend using rubbing compound to bring the level of both the basecoat and clearcoat down.
Tack Rag
Used for removing all dust before spraying paint. This is not needed for the paint pen or brush bottle.
Masking Tape (3/4 inch)
An automotive grade masking tape that leaves no residue. Do not tape around the area you are spraying, as it will leave a ridge where the tape has been applied. Spray painted surfaces should be blended.
Wax and Grease Remover
Removes all wax and grease from the spot you are repainting.
- When to use: Before any paint application
- After painting: Do not wax repair area for 30 days
One Step Rust Converter (Spray or 4 oz Bottle)
This product prepares rusted surfaces for paint. Rust Away chemically reacts to convert rust into a hard, black primer sealer. Apply Rust Away on rusted surfaces and rust is permanently converted and ready for primer and topcoat.
Auto Body Filler (0.75 quart)
Use for repairing dents and dings. After pounding out the damaged area, filler is used to restore the original contour of the part. It should be followed by either a Glaze coat or spot putty.
Glaze Coat (30 oz)
This is a two part putty compound that will not shrink and is used to fill small scratches, pin holes in the body filler, etc.
Spot Putty
This is basically a thickened primer paste that is used for filling scratches, etc. in the surface.
Three Plastic Spreaders
Used for applying the filler, glaze coat or spot putty.
Flexible Bumper Repair Kit
Used for repairing tears in the rubberized bumper cover. There is no paint in this kit.
Catalyzed Clearcoat (11.8 oz spray can)
This clearcoat has a self contained hardener right in the can. Once the hardener is activated (by pressing down on the special pin on the bottom of the can), the hardener is released. By shaking the can for approximately two minutes, you now have a catalyzed clearcoat in a spray can which dries hard and shiny. You will not need to use rubbing compound with this product.
- Use within: 24 hours of activation
- Warning: This formula contains Isocyanates and is very toxic. Don't even think about spraying this product without proper respiratory protection! Make sure you use a protective respirator designed for Isocyanates. The respirators we sell on the site are approved for use with this paint.
- Recommended for: Professionals with spraying experience only - once it is sprayed, it cannot be easily removed!
Clearcoat Blender
This product is used to blend freshly applied clearcoat right into the existing finish. Be sure to follow the directions on the can. A chemical respirator is recommended!
Chemical Respirators
This respirator is recommended for spray paint applications. It is a maintenance free respirator which is discarded when the organic vapor cartridges are spent. The package includes the respirator with permanently attached organic vapor cartridges and filters.
Spray Can Trigger
This is a plastic handle which goes over the spray can giving it a feel of a paint gun. If you want better control of the paint coming out of the spray can, this product is highly recommended.
Surface-Specific Instructions
Metal Surfaces
- Remove rust with rust converter if present
- Sand with 220-400 grit sandpaper
- Apply automotive primer to bare metal
- Sand primer smooth with 400-600 grit
- Apply basecoat (and midcoat if tricoat)
- Apply clearcoat
- Polish with rubbing compound
Non-Metal Surfaces (Bumpers, Plastic, Fiberglass)
Most modern bumpers are made out of a rubberized material. If the paint and primer has been scraped off, the bare bumper surface will need to be primed.
- Clean surface thoroughly
- Apply SEM Adhesion Promoter (critical step - required for proper paint adhesion)
- Apply automotive primer
- Sand primer smooth
- Apply basecoat (and midcoat if tricoat)
- Apply clearcoat
- Polish with rubbing compound
Clearcoat Notes
Same Clearcoat for All Paints: The same clearcoat can be used for all paint colors. If you are repairing a flexible bumper or non-metal surface, make sure you use the SEM Adhesion Promoter. You can use the clearcoat on both metal and non-metal surfaces.
Primer Notes
Our automotive primer will work on both metal and non-metal surfaces. If you are using body filler, you should always use primer. If you are using body filler on a non-metal surface, make sure you order the SEM Adhesion Promoter.
Common Repair Scenarios
Repairing a Paint Chip
We recommend the paint pen for repairing paint chips. (Make sure the paint chips are not larger than a pencil eraser!) Some of you are used to using the brush cap bottle and you can also achieve excellent results by following the directions on our site under "How to Apply". We find the paint pen easier to use for repairing small chips.
For scratches that have gone through the paint layers to expose the underlying surface (metal, plastic, rubber, etc.), you will need primer. If you need to fill deep scratches, use several coats of primer and gradually build the surface up. Paint chips larger than a dime should be sprayed for best results.
Key Scratches
Best method: Spray entire panel
For the best job, you will need to sand down the entire panel where the key scratch is located, build up the surface with spot putty and primer and spray the entire panel with basecoat and clearcoat.
Advantages of Spraying:
- Since you have completely sanded and painted over the scratch, it will be gone
Drawbacks of Spraying:
- Considerable time and effort
- Spraying over the original paint. In general, it's best to keep the original paint on your vehicle if possible.
- All metallic paints must be blended into the adjacent panel. For some colors, you can end up practically spraying the entire side of the car. Gold colored cars are the worst.
Advantages of the Paint Pen:
- Speedy repair
- Nearly all of the original paint except the scratch will be retained
- Great for small chips and scratches (not suitable for anything larger than a pencil eraser!)
Drawbacks of the Paint Pen:
- Upon close inspection, you will notice the repair on metallic painted surfaces. Solid colors can virtually disappear.
- Only suitable for a paint chip no larger than a pencil eraser
Peeling Paint
During the mid 1990's, many Chrysler products had severe paint peeling problems. We have also had reports of some GM vehicles with the same problem.
The only way to completely fix peeling paint is to completely strip the vehicle down to bare metal and start over again. However, as a half measure, you can sand the peeling areas down, apply the primer and proceed to paint. This will not stop the peeling but it will improve the appearance of the vehicle for a short time. Eventually, the paint will peel in other areas and you will have to do it again.
Some vehicle manufacturers have repair programs for peeling paint, but most of them will tell you that there is no recourse and "it just happens with age!" This is simply not true.
Peeling Clearcoats
When the clearcoat has peeled away from the basecoat or is wearing out, you will have to sand down the entire area where the clearcoat is peeling or worn out. You can't just apply clearcoat as the basecoat becomes damaged without the protection of the clearcoat.
Procedure:
- Sand down entire peeling area
- Prime bare spots
- Sand smooth with 400-600 grit
- Spray basecoat over entire area
- Spray clearcoat
- Polish with rubbing compound
Dull Clearcoats
If the clearcoat is just dull, you may be able to revive it with a polishing compound. Check your local auto part stores for polishing products made for clearcoat.
Dents
Dents in a panel or bumper can be repaired with our auto body filler. Large damaged areas should be repaired by a trained professional. Small dents can be pounded out and then filled with auto body filler, sanded smooth and primed.
Holes
Holes in a panel or bumper can be repaired with our auto body filler. If you have an actual tear in a bumper, you should use our bumper repair kit to fix the tear then shape and smooth with auto body filler. Apply a metal or plastic backing to the hole if necessary and apply the filler. Sand smooth and apply primer.
Rust Repair
Small rust spots:
- Grind down to bare metal
- Apply rust converter (Rust Away or One Step Rust Converter)
- Let dry completely
- Prime and paint
Large rusted areas: Recommend professional repair. If you have rust bubbles in your paint, grind these areas down and apply the Rust Converter.
Painting Over Existing Paint
Compatibility Check
Recent paint jobs (Maaco, Earl Scheib, etc. within last year):
- Test on inconspicuous area first
- These shops use a type of enamel not compatible with our paint
Factory finish or professional body shop:
- Should have no compatibility issues
Preparation
- Clean the paint surface with a wax and grease remover or good detergent
- Wetsand the paint with #400 sandpaper until it is dull
- Prime any bare spots
- Once the primer is dry, lightly wetsand the entire surface with #600 sandpaper
- Apply the paint as given in the directions
Note: Wetsanding is accomplished by using wet and dry sandpaper, which we sell on our site. Using a bucket of water or hose, thoroughly wet the surface to be sanded and the sandpaper. The nice thing about wetsanding is the sandpaper will not clog up because the water keeps it clean.
Special Applications
Interior Colors
Typically interior colors are a vinyl paint in late model vehicles. Older vehicles with metal interiors use the same paint used on the exterior. Interior colors are not color coded on the vehicle anywhere so you have two choices:
- You can borrow our color books
- Go to a body shop with interior color chips and have them tell you what color code you have
Once we know the color code, we can make the paint.
Powder Coatings
Our paint should be fine but make sure it will not lift or wrinkle the existing finish. Apply some automotive lacquer thinner by wetting the surface and giving it a couple of rubs with a damp cloth. If the existing finish does not soften or wrinkle, our paint should be okay to use. It wouldn't hurt to also test a small area before recoating the entire piece.
Powder coatings are urethane, cured and baked at high temperatures. Clean the area with wax and grease remover then wetsand the area with first 220, then 600 grit sandpaper. Use primer if the area has scratches you want to fill and then apply the basecoat.
Painting Your Entire Vehicle
Important: You can use our paint to paint your entire car but it is a considerable amount of work. We strongly advise against trying to paint your whole car with spray cans! Rent or purchase a professional auto body spray gun.
Paint Quantity Needed
| Vehicle Size | Paint Needed | Add for Jambs/Color Change |
|---|---|---|
| Large Pickups, SUV's, Vehicles (i.e. Cadillac) | One gallon | +1 quart |
| Medium Size (i.e. Ford Mustang, Subaru Outback) | 3 quarts | +1 quart |
| Small Car (i.e. VW Jetta, Toyota Corolla, Chevrolet Geo) | 2 quarts | +1 pint |
Additional Paint Needed
If you are painting underneath the hood, trunk, door jambs, etc., you should add another quart for medium and large vehicles and a pint for small vehicles. If you are changing the color of the vehicle, add another quart for medium and large vehicles and a pint for small vehicles.
Equipment Required
- Professional auto body spray gun (NOT spray cans)
- Power buffer with large buffing pad
- Double cartridge auto body respirator
- Full body protective suit with hood
- Safety goggles
- Rubber gloves
- Well-ventilated area or spray booth
Safety Requirements
Critical Safety Information:
You should paint in a well ventilated area using a professional double cartridge auto body respirator. If you can detect ANY paint odor through the respirator, you need to change the cartridges immediately. Completely cover your body from head to foot so you do not have ANY bare skin exposed. Wear safety goggles! Use a pull over hood to protect your head.
Obviously the best place to paint is in a professional auto body spray booth, but this will usually be impractical. If you are painting in a garage, leave the garage door open a few feet, and have sufficient air flow to remove the paint fumes. Make sure somebody knows you are painting and approximately what time you will be done so they can check on you. If you experience ANY dizziness, etc., stop painting immediately, get fresh air and call a physician. Automotive paint is quite toxic so please be careful!
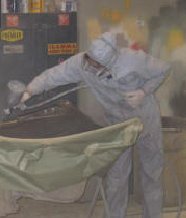
Notice the painter in the picture. Full body suit with hood, gloves, double cartridge respirator and face mask. You don't want to paint with anything less!
Painting Instructions
Make sure you read the humidity and temperature warnings! Too much humidity will cause your paint job to turn into a nightmare of white streaks and haze through the paint. Too hot and the paint will dry before it hits the vehicle!
Preparation
- Use automotive masking tape and special masking paper and tape the entire vehicle. You can also use paper wheel covers. Do not use cheap masking tape and newspaper as the tape will end up leaving a residue everywhere and newsprint often contains dust.
- Repair all rust, dents, scratches, etc. Use primer on all bare metal.
- Thoroughly sand the entire vehicle with #220 sandpaper. Follow this by wet sanding with #400. Remember, all paint will do is change the color of the surface underneath and it will not fill scratches, dents, chips, etc.
Painting Process
If using spray cans: Simply start applying the paint starting from the roof. Spraying large areas from a spray can will be difficult as it is hard to apply evenly when the paint is only coming out in an 8" spray pattern. Get a spray gun!
When using a spray gun: Thin the paint 1:1 with automotive lacquer thinner. There are other types of thinners/reducers available to use with our paint (Universal BaseCoat) and if you want to use these products, consult with your local autobody supply store.
A professional spray gun can put out a pattern over two feet and it makes painting the vehicle much easier. Spray full wet coats and then let the paint dry. Apply enough paint for good coverage (usually two good coats). Metallic paints should have a final mist coat to spread out the metallic evenly. Let the paint thoroughly dry.
Single Stage Paint
For single stage paints, you can now start polishing the paint. For a mirror smooth surface, you can wet sand the entire car down with #1000 grit. This will remove any dust, dirt, etc. in the paint and also you can sand out any runs, drips or sags in the paint.
Basecoat/Clearcoat Paint
Basecoat/Clearcoat paints should have a final coat of basecoat before applying the clearcoat. You can still wet sand the finish before applying this final coat of paint. After the basecoat is dry, apply the clearcoat. Two coats will provide good coverage. You can sand the clearcoat down with #1000 grit to obtain a glossier finish.
Polishing
Use a medium duty rubbing compound to polish the clearcoat. Don't even think of doing this by hand if you are repainting the entire vehicle! Use a professional power buffer with a large buffing pad.
Power Buffer Warning:
Using a power buffer takes practice, so don't practice on your car. Common problems are:
- Burning the clearcoat and paint (you stayed in one place too long applying too much pressure)
- Removing the clearcoat or paint around the edges (you will have to re-apply the paint and clearcoat again)
- Going right through the clearcoat (you will end up trying to polish the basecoat which will never get shiny and you will have to re-apply more clearcoat)
Practice on perhaps a used part, piece of sheet metal, etc.
Critical Application Notes & Reminders
Above all else, ==> practice <== using the paint off your vehicle first!
Application Guidelines
- Paint pen: Pencil eraser size maximum
- Brush: Dime size maximum
- Spray: Everything larger
- Metallic paints: Flake won't lay properly with pen/brush - will look darker even with perfect match
Essential Preparation Rules
- All unpainted surfaces need to be primed, even small chips if they are down to the metal.
- Paint pen or Brush cap bottle? This is more of a personal preference, but the paint pen is easier to use and avoids the blob created with brushing the paint.
- We recommend purchasing the 2 oz. bottle of acrylic lacquer thinner. It's great for cleanup. It is especially useful with the paint pen as you can keep the applicator (the nib) clean and free of excess paint buildup.
- Your painted surface will only look as good as the prep work you have done. Paint will not fill dents, remove scratches or smooth a rough surface. If you are spraying, you must sand the entire area first, then prime, sand again and re-prime until the area is quite smooth. Professional body shops use a lot of primer!
- Rusty areas need to be treated with a special rust remover. We sell a product on our site called One Step Rust Converter (spray) or Rust Away (4oz. bottle) which converts rust to black primer. If you have rust bubbles in your paint, grind these areas down and apply the Rust Converter. Large rusted out areas are best left to professionals!
- You can paint directly over the existing paint, but in the body shop, the technician will normally sand down the existing paint and then apply primer to fill small scratches and imperfections.
- A sealer is a special type of primer that is normally used before an entire paint job. It must be sprayed with professional spray equipment and is not suitable for a spray can so we do not sell sealers.
- You can paint an entire vehicle with our paint. You must polish the final finish with rubbing compound. You will have to use a power buffer to obtain the desired gloss. Polishing an entire car by hand is almost impossible!
- You cannot apply paint over wax. Use a wax and grease remover or scrub the area with detergent to remove the wax. After completing your repair, do not wax the area for 30 days.
Temperature and Humidity
Critical for spray painting success. Always check product directions for:
- Optimal temperature range
- Maximum humidity levels
- Too humid: White streaks and haze through the paint
- Too hot: Paint dries before hitting surface


