How to Apply Touch Up Paint and Make Your Car Look Great
The MOST important instruction is to PRACTICE OFF the vehicle!! Do ALL the steps before applying any paint to your vehicle!
You can do this! If you are wondering if you can really apply touch up paint to your vehicle, and make it look good, the answer is yes. Just read the instructions first and take your time. You will be able to expertly repair car scratches using these simple touch up paint directions. We show you how to use touch up paint in a spray can, paint pen, or brush bottle to repair car scratches. It is easier than you think.
Warning
Automotive paint is very hazardous. Keep away from children. Do not use any of
the products until you have read and understand the product directions and warnings. We recommend rubber gloves, chemical respirator, safety goggles and work
in a well ventilated area. Please store the materials in a safe place. Interior Paint is a vinyl paint which does not require clearcoat or polishing.
PaintScratch, Inc. is not responsible for your results using our paint products. We recommend all customers consult with a professional auto body repair person before attempting to repair their vehicle. Your results may vary and be completely different from what a trained expert can achieve.
Please note:The spray can nozzle is not shipped attached to the spray can! The nozzle will be either in the cap or the box. Please attach the nozzle to the spray can stem.
Shelf Life
The shelf life of the paint pens and touch up bottles is one year or more. However, if stored in a warm location, it can only take a couple of hours
for the paint to completely dry up, even if you have not opened the bottle. Don't store the paint in your glove box. Store is a cool, dry place. The
spray cans will last several years. The nozzle will clog if not cleaned properly.
How to Repair Car Paint - Steps to Success
- Find and order your car paint. We sell over 100,000 car paint colors and all the painting accessories you need.
- Test the color match, and practice. Before painting your car, try the auto paint on another surface like a metal can or an old picture to test the match. Let it dry, and if it looks good, your are ready to start the scratch repair.
- Choose good painting conditions. For best scratch repair results, find a place (like your garage) that has low humidity, is not in direct sunlight, and is at least 50°F for brush cap bottles and paint pens, and at least 70°F for car spray paint.
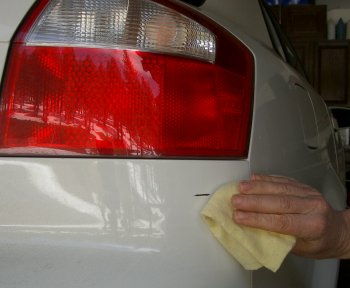
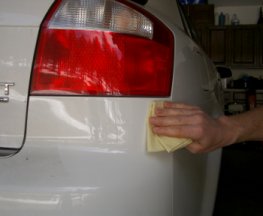
- Prepare your car. Clean the auto paint area you want to touch up using soap or wax and grease remover. If your auto paint is rusty, remove all traces of rust with 220 grit sandpaper or a wire brush, and apply Rust Away (sold in our store).
- Apply primer to any place where bare metal or plastic is showing. Use very thin coats of primer and let it dry at least 20 minutes to overnight. Never use enamel primer.
- Apply a basecoat of your paint color. This is the actual auto paint color you ordered to fix your car scratch. Apply several thin coats to get the level of the repaired scratch to match the level of the surrounding car paint. Let it dry at least 20 minutes to overnight.
- Apply clearcoat to your auto paint. Apply several thin layers of clear coat, letting it dry between coats (about 10-20 mins). Be careful when applying clearcoat. You need to float it over the basecoat. Clearcoat acts like a solvent and any pressure applied will remove the basecoat.
- Use rubbing compound (Cutting Creme) to make it shine. Wait at least three days, then apply rubbing compound (cutting creme) to the the entire area of car paint you fixed. This will make it smooth and shiny. Wait at least 30 days before waxing.
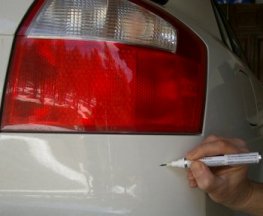
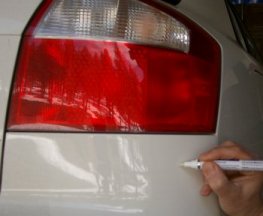
Fixing a bumper scratch using a touch up paint pen. |
Detailed Touch Up Paint Directions
We have created the following detailed touch up paint directions for specific car paint products like paint pens, auto paint spray cans, and car paint bush bottles. By following these detailed instructions, you will get the best results.
- Detailed Paint Pen Instructions
- Detailed Brush Cap Bottle Instructions
- Detailed Spray Can Instructions
- More Tricoat (base/mid/clearcoat) Information
- Using your own Spray Equipment
- Water Based Paint Information
- Blending the Paint
Touch Up Paint Tips, Suggestions and Tricks
Please read through the following list of touch up paint tips for best car scratch repair results.
- The pints, quarts and gallons of basecoat, midcoat, clear and primer are ready to spray and do not require thinning.
- If you get paint on your skin, remove with paint thinner and wash thoroughly with soap and water.
- Do not try to use the paint pen on areas larger than a pencil eraser. Larger areas must be sprayed.
- Paint can easily leak out of the paint pen if you do not use it correctly!
- Do not try to brush areas larger than a dime. Larger areas must be sprayed.
- Use an approved automotive paint respirator and WEAR safety goggles and gloves when handling automotive paint to protect your eyes and skin!! Please read the information below for best results.
- When spraying, always test for paint compatibility. Paint an inconspicuous part of the vehicle, let dry and see if there is any reaction.
- Do not apply our paint over enamel paint or enamel primer.
- Do not spray primer, paint or clearcoat in direct sunlight!
- First time? Did you know you can completely remove any new paint with automotive lacquer thinner and start over without damaging the original finish?
- Make sure you use SEM Adhesion Promoter if you are spraying a plastic, rubber or chrome surface. Failure to do so will result in the paint peeling off within a few months! This goes under the primer, basecoat and clearcoat. If you are spraying over a surface which has already been painted, then you just need to scuff the area down to give the paint a good surface to bond to.
Additional Touch Up Paint Directions and Tips
Testing the Paint Color Match
ALWAYS test the paint before applying it to your vehicle! You are responsible for making sure the paint matches by testing the color BEFORE you apply it to your vehicle! If the color is off, the clearcoat or the primer WILL NOT HELP to make the color match better! If you apply the paint to your vehicle and it doesn't match, you will have to wash it off with automotive lacquer thinner or worse, if you allow it to thoroughly dry, you will have to sand it off."Practice Applying Touch Up Paint
Take a little time and practice using the touch up paint before you apply it to your car. This will give you a good feel for the paint and you can check the color match. Use a surface such as a metal can, a glossy sheet of paper, etc. to practice on. Use several light coats rather than one heavy coat when brushing or spraying the paint. Make sure you let the paint dry properly. If you really want an excellent repair, don't skip practicing!Paint Pens, Brushing and Spray cans
Do not try to use the paint pen on areas larger than a pencil eraser. Do not try to brush areas larger than a dime. If you do, the area will look very uneven. When you apply metallic paint with a pen or brush, the metallic flake will not lay down properly. Even with a perfect paint match the paint will look darker. Save yourself lots of grief and use a spray can for larger areas!Paint Spraying-Humidity and Temperature Warning!
Make sure you do not spray in wet or humid conditions! Do not spray in direct sunlight. To test the humidity, spray some of the clearcoat and see how it dries. If it dries with a whitish haze or streaks, it's too humid to paint! Spray paint should be applied when the temperature is at least 70°F and the humidity is below 50%. Also, if it is too hot, over 80°F the paint can dry before hitting the vehicle, leaving a very rough surface.Drying Times for Touch Up Paint
It is important to let the basecoat dry before applying the clearcoat and letting the clearcoat dry before polishing. Be careful when applying clearcoat. You need to float it over the basecoat. Clearcoat acts like a solvent and any pressure applied will remove the basecoat. Usually letting the paint dry At least 20 minutes to overnight is sufficient. Drying times can really vary depending on the temperature. If the temperature is below 70°F, the paint can take much longer to dry.Car Paint Compatibility Warning
If you have had your vehicle painted at Maaco, Earl Schieb or any other inexpensive paint shop within the last two years, our paint will lift your paint. If in doubt, you can paint a small inconspicuous part of the car and check for lifting.Key Scratches in Auto Paint
The paint pens work well on key scratches as you can easily control the amount of paint and apply it to the scratch. Try to follow the scratch as closely as possible with the basecoat. Apply the clearcoat and use rubbing compound (cutting creme) to smooth and shine the area. Be careful when applying clearcoat. You need to float it over the basecoat. Clearcoat acts like a solvent and any pressure applied will remove the basecoat.Primer for Repairing Car Scratches
If you have an unpainted surface, either bare metal, plastic, rubber, etc., APPLY PRIMER! Primer is made to stick to unpainted surfaces and paint is designed to stick to primer! Primer can also be used to fill small imperfections in the surface.If you are painting a flexible surface (such as a rubberized bumper) and you are spraying the paint, you should order the SEM Adhesion Promoter as this is required for proper adherence for the primer to the surfaces. Again, this is sprayed BEFORE the primer layer. The adhesion promoter is only required when you are spraying the paint and not for the touch up bottles and paint pens.
Clean the area of all dust with a tack rag and apply primer to the unpainted surfaces. Make sure you let the primer dry thoroughly before applying the color coat. Lightly sand the primed area with #220 grit sandpaper followed by #600 wet and dry.
Obtaining a Glossy Finish with Rubbing Compound (cutting creme)
Our clearcoat requires a final polishing with rubbing compound (cutting creme) (which we sell on our site) to make the finish glossy. Do not use polishing compound, it is not aggressive enough to polish the clearcoat. There is a big difference between rubbing and polishing compound. Also, do not use heavy duty rubbing compound as this is too aggressive and will dull your finish. If you are spraying a large area, we recommend having the area machine polished as trying to polish the area by hand would be time consuming and require considerable pressure to obtain the proper gloss. You can use polishing pads with your electric drill, or go to your nearest detail shop and have them polish it for you. Machine polishing takes skill and it's very easy to burn right through the finish. Our rubbing compound (cutting creme) can be applied by hand or machine.
Bumper Paint and Non-Metal Surface Paint Scratch Repair
If you are painting a flexible surface (such as a rubberized bumper) and you are spraying the paint, you should order the SEM Adhesion Promoter as this is required for proper adherence for the primer, basecoat and clearcoat. The adhesions promoter is sprayed BEFORE the primer layer. The adhesion promoter is only required when you are spraying the paint and not for the touch up bottles and paint pens. The adhesion promoter is used over the surface just before applying the primer.Fiberglass Scratch Repair Directions
If you are painting a sturdy, rigid fiberglass part, you can treat it just like metal. However, it never hurts to use the SEM Adhesion Promoter on any non-metal surface for maximum paint adhesion. Make sure you spray the adhesion promoter BEFORE the primer.Powder Coatings Scratch Repair Directions
Our paint should be fine but make sure it will not lift or wrinkle the existing finish. Apply some automotive lacquer thinner by wetting the surface and giving it a couple of rubs with a damp cloth. If the existing finish does not soften or wrinkle, our paint should be okay to use. It wouldn't hurt to also test a small area before recoating the entire piece.Powder coatings are urethane, cured and baked at high temperatures. Clean the area with wax and grease remover then wetsand the area with first 220, then 600 grit sandpaper. Use primer if the area has scratches you want to fill and then apply the basecoat.
Using Your Own Spray Equipment to Repair Car Paint
Our pints, quarts and gallons of primer, clearcoat, basecoat and midcoat are all ready to spray and do not need thinner.The container may give directions for thinning but we have ALREADY added the thinner!
Reducer
We use a medium (mid-temp) universal urethane reducer in the pints, quarts and gallons. Normally we will use PPG paints unless the formula is not available and then we will try another paint brand.
Thinning the 2oz. size
If you purchased the 2 oz. size to use in your own spray gun or are using a Preval Spray Gun make sure you follow the directions. The tip size for air brush should be 1.0mm and for a spray gun from 1.2mm to 1.3mm.
You will need a small container of automotive lacquer thinner to thin the paint (unless you have a waterbased paint which will need special water based thinner). Do not use regular lacquer thinner sold at Home Depot, etc. as it is the wrong kind. It must be automotive lacquer thinner. Do not use old thinner! If it is more than a couple of months old, use it to clean or prep, but do not use it to thin your paint. It will create a disaster on your vehicle!
Only the 2oz. basecoat, midcoat, clearcoat and primer need to be thinned. Thin with one part lacquer thinner to one part basecoat, midcoat, clearcoat or primer. If the paint is too thin, add additional paint. Too thick, add more thinner. Our paint does not need a catalyst or activator as it air dries.
Cleaning your Equipment
Clean up your equipment with either automotive lacquer thinner for solvent based paint or soap and water for waterbased paint. Nearly all of the paint we sell is solvent based so you will typically use thinner to clean up with. If you are unsure if the formula is water based, see if the paint will mix with water. If it does, you have a water based paint and you would use soap and water to clean your equipment.Tri-Coat Car Paint Repair Directions
Any color that has the word "Tri-coat" in the color description will need three different steps to achieve the correct color. First the basecoat is applied, followed by the midcoat and finally a clearcoat is applied. Make sure you practice before applying this touch-up paint to your vehicle.Lightening/Darkening Car Paint when Spraying Clearcoat
By adjusting the distance you spray from the surface, you can make the clearcoat lighten or darken the paint. To lighten the paint, hold the spray can (or spray gun) farther away. Holding the can or spray gun closer will darken the paint. This will take a bit of practice and does not always work with some paint colors. Practice spraying OFF your car first to see how the technique works.Waxing After Applying Touch Up Paint
Allow the car paint to dry for 30 days before waxing for best results.Storing Car Paint - How to Store Touch Up Paint
Store in a cool, dry place. Do not leave the bottle in your vehicle, as heat will dry up the paint. To make the paint last as long as possible, you can store the paint in your refrigerator. (If your spouse will let you!). Don't freeze the paint!Hazards and Safety-VERY IMPORTANT! PLEASE READ!!
Automotive touch-up paint including primer and clearcoats are EXTREMELY hazardous. Keep away from children! Call a physician IMMEDIATELY if swallowed. Keep out of direct sunlight and heat over 120F. DO NOT STORE IN CAR and avoid freezing. Contains HAZARDOUS Waste. EPA requires proper disposal. Use with adequate ventilation. If you experience any dizziness, discontinue product use immediately and call physician. This product contains chemicals known to the state of California to cause birth defects, cancer and other health problems. The main thing here is to use the product with adequate ventilation. Use an approved automotive paint respirator and WEAR safety goggles when handling automotive paint to protect your eyes!! This includes the primer, paint and clearcoatSDS Information
10 oz. rust converter spray can4 oz. rust converter
Adhesion Promoter
Automotive Lacquer Thinner Warning! This is a Very dangerous/toxic product, but no substitues at this time.
Basecoat and Tricoat
Body Filler
Catalyzed Basecoat
Clearcoat (paint pen, 1 and 2 oz. bottles and larger sizes)
Catalyzed Clearcoat
Clearcoat
20 oz. Clear Coat Blender
Flat Black Spray Can
Glazing Compound
Primer
Rubbing Compound (Cutting Creme)
Sand Paper
SEM Bumper Repair
Spot Putty
Wax and Grease Remover


