


Chevrolet Impala Touch Up Paint (170 OEM Colors)

Search for your Impala's color
-

You Drive Me Grazy Pearl
ChevroletCOLOR CODEWA380A/
WA509B/ GA6/ GR5 - You Drive Me Grazy Pearl -

Green With Envy Pearl
ChevroletCOLOR CODEWA387A/
GC8 - Green With Envy Pearl -

Imperial Blue Metallic
ChevroletCOLOR CODEWA403P/
37/ GAP - Imperial Blue Metallic -

Edible Berries Metallic
ChevroletCOLOR CODEWA409B/
410B/ / GJ3 - Edible Berries Metallic -
Edible Berries Metallic
ChevroletCOLOR CODEWA411B/
GGA/ GJ6 - Edible Berries Metallic -

Pepperdust Pearl
ChevroletCOLOR CODEWA444B/
GH9 - Pepperdust Pearl -

Abalone White Tricoat
ChevroletCOLOR CODEWA472B/
WA584B/ WA486B - Abalone White Tricoat -

Athenian White
ChevroletCOLOR CODEWA492P -
Athenian White -

Light Wheat (Interior)
ChevroletCOLOR CODEWA503F -
Light Wheat (Interior) -

Black Meet Kettle Pearl
ChevroletCOLOR CODEWA506B/
WA507B/ GB0/ GB9 - Black Meet Kettle Pearl -

Sterling Silver (matt)
ChevroletCOLOR CODEWA569F -
Sterling Silver (matt) -
Sterling Silver (matt/wheel)
ChevroletCOLOR CODEWA569F-
W - Sterling Silver (matt/ wheel) -

Light Silver Metallic (matt)
ChevroletCOLOR CODEWA578Q -
Light Silver Metallic (matt) -

Gray (matt)
ChevroletCOLOR CODEWA598F -
Gray (matt) -

Black Carbon Metallic (Interior)
ChevroletCOLOR CODEWA700S -
Black Carbon Metallic (Interior) -

Brownstone (Interior)
ChevroletCOLOR CODEWA702S -
Brownstone (Interior)
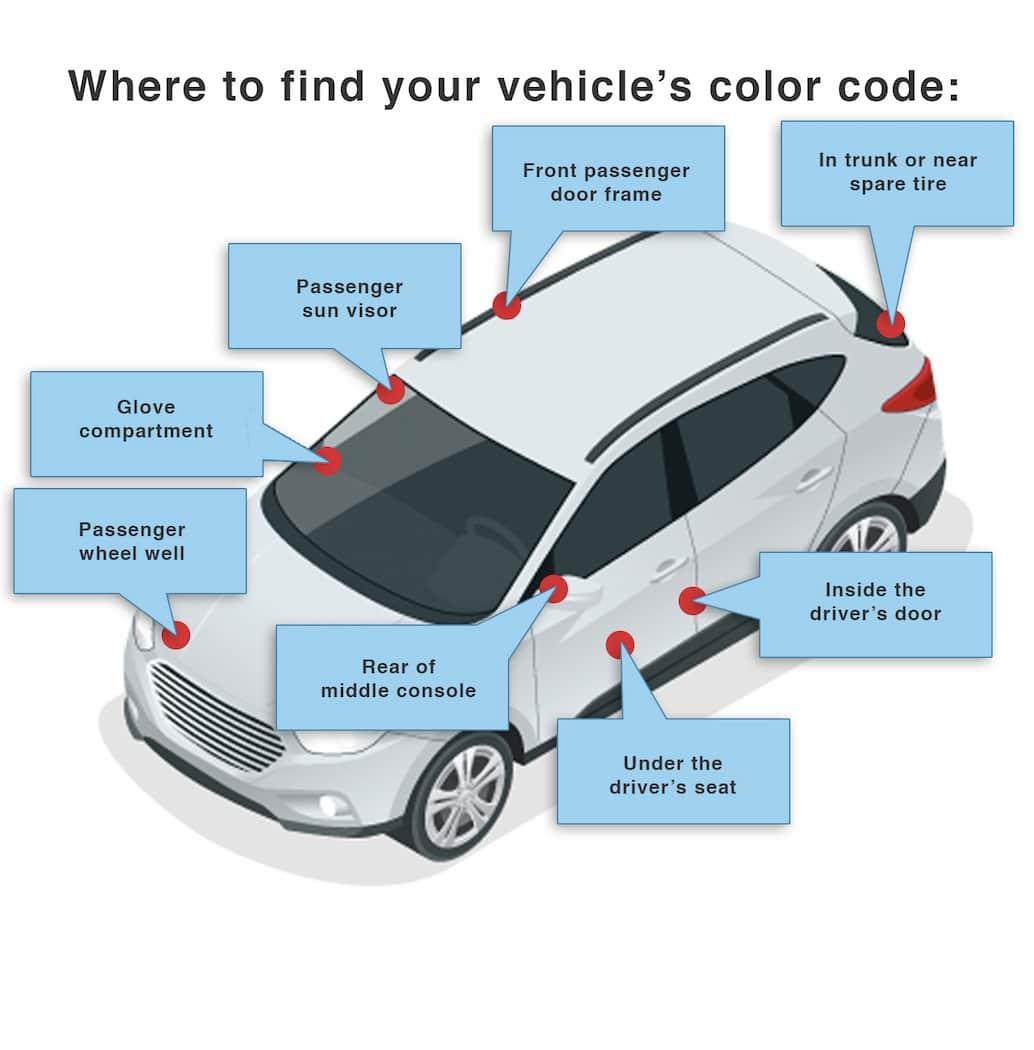
Find Your Chevrolet Impala Paint Code
Chevrolet did not make it easy to find the color code. Over the years they used many different locations and did not standardize the color plate, so it can be hard to locate. Usually it is in the glove box or the spare tire well; otherwise, the search may extend everywhere. The typical code is 51/WA316N, usually preceded by BC/CC. Two tone codes can appear as BC/CC U316N or BC/CC L316N (U for Upper, L for Lower).
Chevrolet Impala Paint Info
Chevrolet Impala Colors by Year
Let us know the year your Impala was manufactured. We'll eliminate colors that won't match your vehicle.
- 2019 (25 colors)
- 2018 (28 colors)
- 2017 (25 colors)
- 2016 (20 colors)
- 2015 (23 colors)
- 2014 (22 colors)
- 2013 (18 colors)
- 2012 (16 colors)
- 2011 (13 colors)
- 2010 (14 colors)
- 2009 (18 colors)
- 2008 (23 colors)
- 2007 (28 colors)
- 2006 (12 colors)
- 2005 (12 colors)
- 2004 (12 colors)
- 2003 (18 colors)
- 2002 (12 colors)
- 2001 (20 colors)
- 2000 (25 colors)